Posts

Arduino RC Car

Image
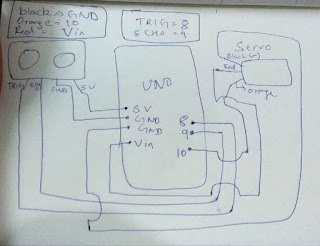
 Materials Required: 1. Arduino Uno 2. Motor 3. Bluetooth Sensor 4. 12V Battery 5. Motor Driver 6. Jumper Wire First of all, make the connection as show in the figure on the top right. Then, download the Arduino IDE and upload the code as given below. Link to download Arduino IDE: https://www.arduino.cc/en/software Code for Arduino // Starting of Program int m1a = 9; int m1b = 10; int m2a = 11; int m2b = 12; char val; void setup() { pinMode(m1a, OUTPUT); // Digital pin 10 set as output Pin pinMode(m1b, OUTPUT); // Digital pin 11 set as output Pin pinMode(m2a, OUTPUT); // Digital pin 12 set as output Pin pinMode(m2b, OUTPUT); // Digital pin 13 set as output Pin Serial.begin(9600); } void loop() { while (Serial.available() > 0) { val = Serial.read(); Serial.println(val); } if( val == 'F') // Forward { digitalWrite(m1a, HIGH); digitalWrite(m1b, LOW); digitalWrite(m2a, HIGH); digitalWrite(m2b, LOW); } else if(val == ...

Music reactive LED Strip

Image
Materials Required: 1. Arduino Uno 2. LED Strip 3. Microphone Sensor 4. Jumper Wire   First make the connection as shown on the top right. Then, install the arduino IDE. Then, upload the code and the led blinks. Link to download Arduino IDE: arduino.cc/en/software Code for arduino     #include <Adafruit_NeoPixel.h>     #include <FastLED.h>     #include <math.h>     #include <SoftwareSerial.h>     #define N_PIXELS  60  // Number of pixels in strand     #define N_PIXELS_HALF (N_PIXELS/2)     #define MIC_PIN   A5  // Microphone is attached to this analog pin     #define LED_PIN    6  // NeoPixel LED strand is connected to this pin     #define SAMPLE_WINDOW   10  // Sample window for average level     #define PEAK_HANG 24 //Time of pause before peak dot falls     #define PEAK_FALL 20 //Rate of f...

Arduino Radar

Image
 Materials Required: 1. Arduino Uno 2. Ultrasonic Sensor 3.Servo Motor 4.Jumpper wires First of all connect all the items as shown in the circuit diagram on the top right of this page. Then download arduino IDE. Arduino IDE download link: https://www.arduino.cc/en/software After you download the IDE upload the code given below and run Code for Arduino #include <Servo.h>. const int trigPin = 8; const int echoPin = 9; // defining time and distance long duration; int distance; Servo myServo; // Object servo void setup() { pinMode(trigPin, OUTPUT); // trigPin as an Output pinMode(echoPin, INPUT); // echoPin as an Input Serial.begin(9600); myServo.attach(10); // Pin Connected To Servo } void loop() { // rotating servo i++ depicts increment of one degree for(int i=15;i<=165;i++){ myServo.write(i); delay(30); distance = calculateDistance(); Serial.print(i); Serial.print(","); Serial.print(distance); Serial.print("."); } // Re...